Wow, it's been a week since I last posted? Geez! The kids have been off so that's my excuse. They have "winter break" here in the northeast. Mason kicked it off with strep throat, and we're off to the doctor in a bit to see if Annabelle has it too. I hear it's going around! (Update: No strep! Yaay!)
I started a new table topper the other day. Since putting away my Valentine-themed mat, I felt the need for a new one. I had bought a Lakehouse panel that I thought would be perfect. Plus the Bliss charm packs I have were calling my name. So I loosely based it on the Schnibbles "Madeline" pattern and came up with this so far...
What's that you say? My center squares are too small so the corners don't go to the end of each block? Yes you're right. I have no idea why that happened, I thought I measured correctly. But we'll just pretend it's supposed to be that way, 'k? Here are some fabrics I'm thinking of for the borders. I'm loving all the pinks and greens.
I know this is a quickie, sorry! Off to play with the kids...glad we got some errands done before more snow falls tonight and tomorrow!
♥ Jen
Thursday, February 24, 2011
Wednesday, February 16, 2011
Winner(s)!
Hi all! Thank you to everyone who took the time to leave comments and for entering the Gooseberry Patch cookbook contest! Without further ado, the Random Number Generator chose comment number...
30, which was from JONNI! Jonni, Congratulations! I will get your cookbook to you asap! Since we're so close I can hand-deliver it!
And I have a second place prize too! Remember I showed these heart placemats?
Well some of you liked them as well, so I picked up a set of 4 for you! And the winner is comment number...
2, which was from DONNA! Donna, Congratulations to you too! Donna please send me your address when you can and I will send you your package!
If you didn't win, don't despair, I have more cookbook reviews and giveaways coming up! Stay tuned!
♥ Jen
Monday, February 14, 2011
Come Around for Coffee All Year
Last year I participated in a self-chosen Block-of-the-Month. The only requirement was that our quilts had to be either tea- or coffee-themed. I'm not much of a tea drinker but coffee is one of my favorite things in life. Coincidentally, Pam had recently published her Come Around for Coffee placemat pattern. I instantly fell in love with it and knew it would be perfect for my quilt. And now, it's completely finished! I finished the binding last week, quickly embroidered a label and washed the quilt in Woolite. Officially done!
Here is the back. I pieced together two coffee-themed fabrics.
Love a finished quilt! Thank you Pam for inspiring me...it is a great pattern and I loved working on each and every block! ♥
Have a happy Valentine's Day everyone! Any big plans? The kids and I will make chocolate-covered strawberries when they get home for dessert. We do this every year, they're so simple and delicious.
2 Tbsps. vegetable shortening
1 lb. fresh strawberries with leaves
In a double-boiler, melt the chocolate and shortening, stirring occasionally until smooth. Holding them by the leaves, dip the strawberries into the chocolate mixture. Turn the strawberries while dipping and let excess drip off. Spoon sprinkles, mini M&M's, or coconut flakes over the chocolate. Cool on waxed paper.
The cookbook winner will be chosen in two days! Make sure you left a comment on the post linked to HERE. I hope your week is starting off well!
♥ Jen
 |
| Note the scrappy binding...I love how it turned out! |
Love a finished quilt! Thank you Pam for inspiring me...it is a great pattern and I loved working on each and every block! ♥
Have a happy Valentine's Day everyone! Any big plans? The kids and I will make chocolate-covered strawberries when they get home for dessert. We do this every year, they're so simple and delicious.
Chocolate-Covered Strawberries
16 oz. semi-sweet chocolate chips2 Tbsps. vegetable shortening
1 lb. fresh strawberries with leaves
In a double-boiler, melt the chocolate and shortening, stirring occasionally until smooth. Holding them by the leaves, dip the strawberries into the chocolate mixture. Turn the strawberries while dipping and let excess drip off. Spoon sprinkles, mini M&M's, or coconut flakes over the chocolate. Cool on waxed paper.
The cookbook winner will be chosen in two days! Make sure you left a comment on the post linked to HERE. I hope your week is starting off well!
♥ Jen
Saturday, February 12, 2011
Crafting here and there
The frames that I ordered for Annabelle's letter blocks arrived the other day, and they are perfect! Is there anything you can't find on ebay?? Anyway, I needed 11" frames, which are hard to find in stores.
I had mitered the borders of the blocks, which was not difficult, really. Then I just put a piece of batting between the block and the frame backing. Want to see each one (sort of) up close?
So that was my little project. :-) I even hung them myself and they are level, if you can believe it! I took a picture of another wall in Annabelle's room...I had found these wall stickers at Target last summer.
We had a lot of fun putting these up. And they're easily removable, a big plus!
I went to Christmas Tree Shops the other day...hadn't been there in awhile! Check out these heart placemats I found.
They're nice and big...and look at the quilting! There are little hearts quilted right in!
The best part...$3 for TWO! Ah, love that store. I also got these two storage boxes for some sewing supplies...
These were $4 each, I think. I just love the pattern!
I couldn't leave my kitties out of the fun...so I bought them a new "Super Scratcher." Just add catnip and watch them go nuts!
This morning I took the kids to a Country Folk Art Craft Show. It was nice, but not as big as usual. Anyway I did buy this pretty pincushion.
The vendor had a gorgeous booth. Her website is www.pinkpaperrose.com in case you're interested. The cupcake was made from sweaters. Lots of other cute shabby chic stuff too.
Don't forget to enter my giveaway for the Gooseberry Patch cookbook! I'll be selecting the winner next week! Have a great weekend everyone!
♥ Jen
Thursday, February 10, 2011
"Best-Ever Cookies" Review and GIVEAWAY!
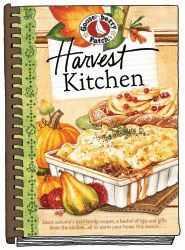
It's another Gooseberry Patch Early Bird Review and Giveaway! As you may recall, my first review was for "Homestyle in a Hurry," and that was lots of fun! I was so excited to receive this one last week...
This will be available at the end of March. Want to pre-order? Click here!
In a small bowl, stir together boiling water and cocoa.
In a separate bowl, blend together butter, shortening and sugar.
Beat in eggs;
Add cocoa mixture. Stir in flour and milk alternately; beat well.
Stir in vanilla.
Fold in nuts, if using. My kids are "anti-nut" in their brownies, so I left them out.
Spread in a greased 18" x 12" jelly-roll pan. Now, I don't know about you, but I have no idea what kind of pan they're talking about. So I just used a good ol' 13" x 9". Thick brownies are better, I figure! Oh, and do yourself a favor, try this trick. Instead of greasing the pan, get some non-stick foil with which to line the pan.
Tear off a sheet, turn the pan over, and press over the pan. Then flip the pan back to the right side, and it will fit right in. Just make sure the non-stick side of the foil is up.
Bake at 350 degrees for 30 minutes. Even though I used a smaller pan, they were ready at 30 minutes as well. See the toothpick holes? I didn't believe it either. LOL
See? You just lift the edge of the foil out of the pan (when the brownies have cooled a bit) and it comes right out!
Cool slightly before topping with FROSTING.
You will need: 1 C. powdered sugar; 2 Tablespoons baking cocoa; 1/4 C. water; 1/2 C. butter, softened: 1/2 C. all-purpose flour; 1/2 teaspoon vanilla extract; and 1/2 teaspoon vinegar.
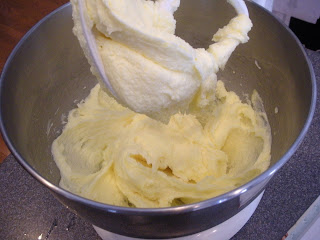
Stir together all ingredients until smooth. Does yours look like this?
If you're using a stand mixer, switch to your whisk attachment...Aah! Much better! No lumps.
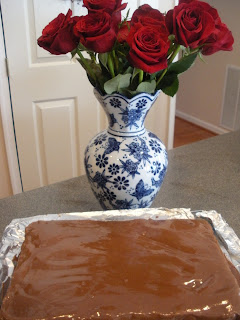
Frost your brownies. Makes 2 dozen.
A tip from me to you: Cut your brownies with a plastic knife. No sticking!
I wanted a yummy beverage to go with these, so my next recipe to try was Hot Vanilla Nightcap.
You will need: 1 C. low-fat milk; 1 teaspoon vanilla extract; 1 teaspoon sugar; 1/4 teaspoon cinnamon, divided; and whipped topping, for garnish.
Pour milk into a microwave-safe mug; stir in sugar, vanilla and 1/8 tsp. cinnamon. Microwave on high for about 70-80 seconds, until hot but not boiling. Top with a generous dollop of whipped topping and remaining cinnamon. Makes one serving.
RECIPES REVIEW:
I am very, very pleased with these recipes! The brownies are rich and lightly chocolately, with a wonderful brownie texture. I was a little nervous about the frosting ingredients....flour in frosting? Vinegar? But I had to stop myself from licking the bowl. Really really delicious. The sweetness from the frosting definitely compliments the flavor of the brownies.
The Hot Vanilla Nightcap is fabulous. Warm and comforting, the vanilla and sugar go just right with the cinnamon and milk. It's a great accompaniment to the brownies. I didn't have any whipped topping when I made this, but it was still yummy.
OK, I have one more recipe to review, and it's another good one! This one is called Lemon Crinkles.
You will need: 18-1/4 oz. pkg. lemon cake mix; 1/2 C. frozen whipped topping, thawed; 2 eggs, beaten; 2 Tablespoons lemon zest; 1/2 C. powdered sugar; and extra powdered sugar for garnish.
In a bowl, combine dry cake mix and remaining ingredients except garnish. I used French Vanilla Cool Whip, oh boy that's good stuff! Next time I make a Hot Vanilla Nightcap, this is going on top!
Mix well. Roll into one-inch balls; roll in powdered sugar.
Place on lightly greased baking sheets, about 2 inches apart. I use parchment paper to line my baking sheets...no need to grease the pans. Also you can have some ready to go for the next batch!
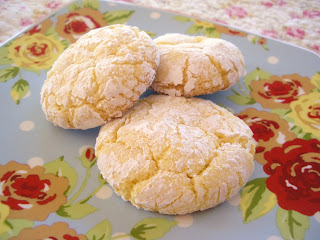
Bake at 350 degrees for 10-12 minutes, until centers start to crack.
Remove while warm to a wire rack; cool. Makes 2 to 3 dozen.
RECIPE REVIEW:
Seriously Scrumptious! Both the flavor and texture of these cookies are excellent. They're chewy in the center and a little crunchier on the outside. The lemon combined with the powdered sugar makes a great sweet-tart cookie! I think this is my favorite recipe of the bunch!
GIVEAWAY:
To win your very own brand-spankin' new copy of this cookbook, just leave me a comment on this post. Please make sure to leave me your email address! Any entries without a way to contact you will unfortunately be disqualified. I will randomly select a winner on Wednesday, February 16th! Thanks for stopping by and GOOD LUCK!
♥ Jen
This will be available at the end of March. Want to pre-order? Click here!
What a great excuse to bake! Not that I really need one, I love to bake. Growing up my sisters and I were always in charge of birthday cakes and Christmas cookies. So over the weekend I chose a few recipes...it was hard to narrow down my list, there are so many yummy ones in this cookbook! The book is divided into chapters, which include "Cookie Jar Classics," "All-American Cookies," and "Holiday Cookies," to name a few. The first recipe that jumped out at me was from the chapter "Best-Ever Brownies and Bars," called Nebraska Brownies. My family loves brownies...and truth be told, they're more than happy with a boxed mix. But taking the time to make them from scratch is worth it. Are you ready? Here's the recipe for Nebraska Brownies.
You will need: 1/2 C. boiling water; 1/2 C. baking cocoa; 1/2 C. butter, softened; 1/2 C. shortening; 2 C. sugar; 3 eggs, beaten; 2 C. all-purpose flour; 1/2 C. milk; 1 teaspoon vanilla extract; and Optional, 1 Cup chopped nuts.In a small bowl, stir together boiling water and cocoa.
In a separate bowl, blend together butter, shortening and sugar.
Beat in eggs;
Add cocoa mixture. Stir in flour and milk alternately; beat well.
Stir in vanilla.
Fold in nuts, if using. My kids are "anti-nut" in their brownies, so I left them out.
Spread in a greased 18" x 12" jelly-roll pan. Now, I don't know about you, but I have no idea what kind of pan they're talking about. So I just used a good ol' 13" x 9". Thick brownies are better, I figure! Oh, and do yourself a favor, try this trick. Instead of greasing the pan, get some non-stick foil with which to line the pan.
Tear off a sheet, turn the pan over, and press over the pan. Then flip the pan back to the right side, and it will fit right in. Just make sure the non-stick side of the foil is up.
Bake at 350 degrees for 30 minutes. Even though I used a smaller pan, they were ready at 30 minutes as well. See the toothpick holes? I didn't believe it either. LOL
See? You just lift the edge of the foil out of the pan (when the brownies have cooled a bit) and it comes right out!
Cool slightly before topping with FROSTING.
You will need: 1 C. powdered sugar; 2 Tablespoons baking cocoa; 1/4 C. water; 1/2 C. butter, softened: 1/2 C. all-purpose flour; 1/2 teaspoon vanilla extract; and 1/2 teaspoon vinegar.
Stir together all ingredients until smooth. Does yours look like this?
If you're using a stand mixer, switch to your whisk attachment...Aah! Much better! No lumps.
Frost your brownies. Makes 2 dozen.
A tip from me to you: Cut your brownies with a plastic knife. No sticking!
I wanted a yummy beverage to go with these, so my next recipe to try was Hot Vanilla Nightcap.
You will need: 1 C. low-fat milk; 1 teaspoon vanilla extract; 1 teaspoon sugar; 1/4 teaspoon cinnamon, divided; and whipped topping, for garnish.
Pour milk into a microwave-safe mug; stir in sugar, vanilla and 1/8 tsp. cinnamon. Microwave on high for about 70-80 seconds, until hot but not boiling. Top with a generous dollop of whipped topping and remaining cinnamon. Makes one serving.
RECIPES REVIEW:
I am very, very pleased with these recipes! The brownies are rich and lightly chocolately, with a wonderful brownie texture. I was a little nervous about the frosting ingredients....flour in frosting? Vinegar? But I had to stop myself from licking the bowl. Really really delicious. The sweetness from the frosting definitely compliments the flavor of the brownies.
The Hot Vanilla Nightcap is fabulous. Warm and comforting, the vanilla and sugar go just right with the cinnamon and milk. It's a great accompaniment to the brownies. I didn't have any whipped topping when I made this, but it was still yummy.
OK, I have one more recipe to review, and it's another good one! This one is called Lemon Crinkles.
You will need: 18-1/4 oz. pkg. lemon cake mix; 1/2 C. frozen whipped topping, thawed; 2 eggs, beaten; 2 Tablespoons lemon zest; 1/2 C. powdered sugar; and extra powdered sugar for garnish.
In a bowl, combine dry cake mix and remaining ingredients except garnish. I used French Vanilla Cool Whip, oh boy that's good stuff! Next time I make a Hot Vanilla Nightcap, this is going on top!
Mix well. Roll into one-inch balls; roll in powdered sugar.
Place on lightly greased baking sheets, about 2 inches apart. I use parchment paper to line my baking sheets...no need to grease the pans. Also you can have some ready to go for the next batch!
Bake at 350 degrees for 10-12 minutes, until centers start to crack.
Remove while warm to a wire rack; cool. Makes 2 to 3 dozen.
RECIPE REVIEW:
Seriously Scrumptious! Both the flavor and texture of these cookies are excellent. They're chewy in the center and a little crunchier on the outside. The lemon combined with the powdered sugar makes a great sweet-tart cookie! I think this is my favorite recipe of the bunch!
GIVEAWAY:
To win your very own brand-spankin' new copy of this cookbook, just leave me a comment on this post. Please make sure to leave me your email address! Any entries without a way to contact you will unfortunately be disqualified. I will randomly select a winner on Wednesday, February 16th! Thanks for stopping by and GOOD LUCK!
♥ Jen
Subscribe to:
Comments (Atom)


